|
When landlubbers - that is how able seamen call the dummies from the landside :) - when they come onboard a sailing ship,
they show a typical mixture of fascination and, erh, irritation
when they see these many different lines, cables, and spars.
And soon they try to escape the complexity ... "oh my gawd" - "woaaah!" ...
But, things are not that difficult ... every line has its defined function - there
are no decorations. All lines, often also referred to as "gears", can be devided into two classes:
"Standing Rigging" - this involves all lines to support the mast and keep it up and save in position.
And
"Running Rigging", or "Running Gears" - this involves all cables needed to move the spars and sails
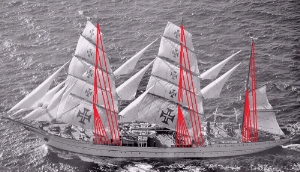
The Standing Rigging
The Standing Rigging involves all cables (lines) that are not moved (except when fitting the masts).
There are only two types: Stays and Shrouds (which include the Backstays).
Both equalize their mutual strain forces, in order to keep
the masts, the bowsprit and others parts in a fixed position; it provides the framework
for the sails.
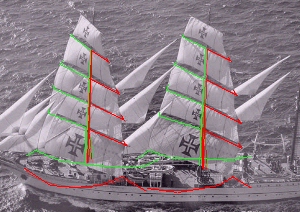
The functions of these elements can be visualized using a picture of the Portuguese training ship "Sagres II" (pronounced as "Shagresh").
Original picture from http://www.gorch-fock-stralsund.de - many Thanks :)
Stays
|
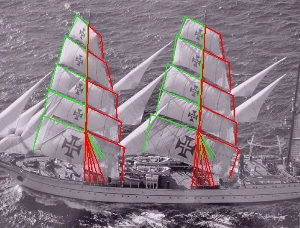
Shrouds and Backstays
|
|
Stays support the mast to the bow. In the 19th century, stay sails (fore-and-aft sails) are "riding" on the stays.
|
Shrouds and backstays support the mast as pairs to both sides of the ship and backward (aft).
Shrouds with ratlines are also for the sailors to go aloft. Backstays have no ratlines
and support the top masts.
|
Today, the stays and shrouds are commonly made of steel cables,
because they have to stand heavy strain forces of several tons.
The Running Rigging
Running Rigging involves all the cables used to move the sails in various manouvres.
The types of those cables are few, even on the most huge sailing ships. You find the Halyard (=Halliard),
the Topping Lift, the Brace, the Sheet, the Clewline, the Buntlines / Leechlines and on ancient ship also the Bowlines - that´s it.
Every single sail has a defined number of those lines, and, in the case of square sails, in pairs for port and starboard.
The more sails, the more cables You have to belay on deck.
It is only confusing at the first sight ... here are all the elements explained:
The functions of the lines are as follows:
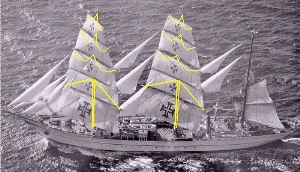
The Halyard
With a halyard (from "haul-yard"), a yard is hoisted up, or eased down.
For square sails and fore-and-aft-sails You find:
Yard Halyards, Gaff Halyards

|
Staysail Halyards and Downhauls
|
|
The halyard for the square yards are used for hoisting or letting down the upper square sail yards, in order to
lower the point of gravity, especially when the ship is riding out a gale.
Except the old lower yards, every yard has only one halyard.
In ancient times, all square yard sails were set or taken in like that. Therefor, all
yards had also a port and starboard pair of topping lifts to balance the yards.
The lower yards are heavier than the upper yards due to their dimensions. Thus, their halyards are moved by
heavy triple block purchaces (gin, triple tackle). Upper yards still have a double purchase. On ancient ships, the lower yards were also hoisted and lowered by the jeers (very heavy
halyards, and two of them on the big first rate ships).
The upper halyards (topsail halyard, topgallant sail halyards and royal halyards) are leading down to the deck in parallel to the
backstays, to the pin rails. For symmetry reasons (to equalize the burden for both rails),
heavy halyards start as a single whip on one side up and come down on the other side where they are
attached to their more or less heavy purchases. Lighter halyards lead directly from the yard
down to the rail tackle.
A square yard halyard is the heaviest tackle of all. It bears tons of burden:
- the yard. A royal yard has some 100 kg, a lower yard, carrying the course, weigh up to 6 tons!
- the attached sail. Heavy weather sails can also weigh 1 ton.
- the sailors going aloft and standing on the footropes. More than 10 men maybe needed to furl a lower square sail.
- the wind, that tends to blow the sail off the mast.
On the windjammers (since 1900), the lower yards, -bowlinesail yards and -bowlinegallant yards
were no longer hoisted or veered. They were fixed in a rack on the mast, allowing them only to swing
horizontally with the braces. Those yards had no halyard.
On the sailships of the "Mir"-class, the so called Choren-Rigging eliminated all halyards.
All those yards are in fixed racks, as they are of a lighter construction.
The gaff has two sorts of halyards: the peak halyard and the throat halyard.
On modern barques, the mizzen gaffs are hanging in fixed gears.
But on schooners, gaff sails are still hoisted and lowered with those halyards.
|
A staysail halyard is hoisting the staysail riding on the stay. This halyard "only"
carries the weight of the sail and the wind force.
The counterpart of the staysail halyard is the downhaul. The staysail may lower just by its own weight
when the halyard is eased, but under strong winds You need the downhaul to take that sail in.
|
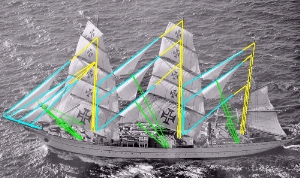
The Topping Lift and the Brace
Topping Lifts
|
Braces
|
Topping Lifts, or simply Lifts, balance the yard vertically. Functions:
- to allow the wind for "filling" the sail equally, to gain from the wind force at the best.
- to prevent the yard from canting over, when the sailors are on the footropes for sail furling.
- to adapt the balance when the ship is heeling with the winds.
Lifts are always in pairs for port and starboard. They lead from the yard arm through a block at the mast down to the deck.
Modern training ships have fixed topping lifts for the upper yards which are hoisted and lowered.
When lowered, these yards are "hanging in their gear". When hoisted and with sails set, those
lifts are drooping loose in front of the sail.
|
To swing around the yards and turn the sails in the wind.
Square yard braces are always in pairs for port and starboard. They lead from the yard arms back to the mast behind (aft),
or the rails at the side of that mast respectively, in order to have enough leverage effect.
On full riggers, where the last mast also has square yards and is called the jigger mast,
there is no mast behind it, and so, the braces of the jigger sails lead to the mast in front of it.
Modern braces are not moved by hand, but by heavy winches.
|
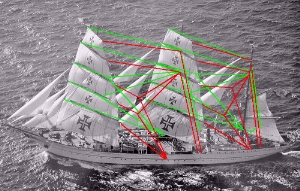
The Sheet, the Tack and the Clewline
Sheets / Tacks
|
Clewlines (=Cluelines)
|
|
Sheets are important to hold the sails stiff in the wind.
The lower corners of the sails (the clews = the clues), are the origin of the sheets and of the clewlines.
When the sheets are hauled taut, the clew lines are eased and vice versa.
Square yard sheets are always in pairs for port and starboard. They lead from the clew down to the next lower yard
or directly to the deck. Mostly, the sheets are belayed on the fiferail around the mast, all attached with a tackle.
Only the lower square sails (the courses) are different:
They have sheets leading backward and tacks leading foreward, for allowing those sails to swing around
with the braces and then stiffen the sail in that position; the clews of the course move a long distance
over the deck.
The sheets take the lion part of the burden, thus, the tacks are also called the
"lazy tacks", because they only function with hard braced yards.
Sheets and Tacks of the courses lead through sheave holes in the ship sides to the pin rails.
|
Clewlines (cluelines, or clewgarnets) are the counterparts to the sheets,
used to haul the sails´ clews up to the yards arms. This is the precondition
to furl the sails by the buntlines and leechlines.
One exception on modern sailships is the upper topsail yard. Their clewline is called the downhaul,
because the clews of that sail have almost fixed sheets, and the entire yard is lowered; by doing this,
the clewline becomes shorter, taking in the clew to the yard arm.
Clewlines are always in pairs for port and starboard. They lead from the clew up the yard arm,
from there to the middle of the yard where lead blocks are attached. Then the clewlines lead
down to the deck, to the pinrail or the fiferail, both arrangements of belayings can be found.
Clewlines are sometimes arranged together with Buntlines, on the pinrail, because both are used
to take sails in. But on the "Sagres II" e.g., the clewlines are belayed as "opposite pairs"
with the sheets
using two neighboured pins on the fiferail.
|
The Buntline and the Bowline (old)
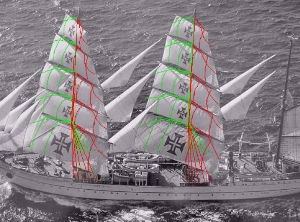
Buntlines and Leechlines
|
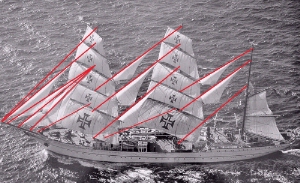
Bowlines
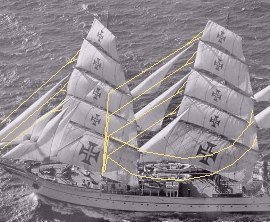
If the Sagres had bowlines, they would lead like this ...
|
|
Buntlines furl the sails to the yards; not as neatly when the ship is in port, but
to allow the sailors on the footropes to bind the sails.
Buntlines are always in pairs of 2, 4, or 6 for port and starboard; sometimes You find a central buntline.
They lead from the sail foot up to the yard, through lizards and lead blocks in the
middle of the yard down to the pinrails; upper sail buntlines are passing through the platforms before.
Their lead is almost in parellel to the shrouds.
Leechlines are a subtype of buntlines that lead from the sail side (the leech) to the yard, to furl the sail better at the yard arm.
|
Bowlines (always in pairs for port and starboard) were used until 1850, on the ancient sailing ships. They came out of use
with the frigates and the clippers, when double top / topgallant sails were introduced to prevent oversized sails.
Due to the few documents, the ancient sails were much more bellied than the sails we know today, and handled different.
They could not brace up as sharp as we can now for many reasons, and the bowline helped to compensate that limit by hauling out
the side of the sail and keep it open for the wind - more or less effectively ... but for most of the time, the bowline was one of the laziest
lines in the whole rigging.
When bowlines came out of use, photography had just been invented and still was an immature technique, and so
we do not have many photos clear enough to show bowlines in action. Therefor, I used this picture
of the Sagres to demontrate their leading in principle.
The Bowline is now known only by historians and modelmakers. But mountaineers still use its knot
to rope up. This knot is today known as bowline hitch in navigation.
|
These are the basics of every sailship rigging (in the "Western hemispere", so to speak). Any sailship can
be reconstructed by using these elements, no matter if it is a barque, a full rigger, a schooner or whatever.
All sails have defined lines attached, and they have a defined number of them:
Running Rigging for a Staysail
-
Halyard: 1
-
Sheet: 2 (p.+stb.)
-
Downhaul: 1
|
Running Rigging for a Square yard sail
-
Halyard: 1
(On modern windjammers, the lower yard, tower topsail and often lower topgallant are fixed in a rack and have no halyards)
-
Sheet: 2 (p.+stb.)
Courses also have a Tack: 2 (p.+stb.)
-
Topping Lift: 2 (p.+stb.)
-
Brace: 2 (p.+stb.)
-
Clewline: 2 (p.+stb.)
-
Buntline: 2 to 6 (pairs, p.+stb.)
-
Bowline: 2 (p.+stb.)
|
Running Rigging for a Gaff sail (Spanker)
-
Peak-Halyard: 1
-
Throat-Halyard: 1
-
Gaff vang: 2 (p.+stb.)
-
Spanker sheet: 2 (p.+stb.)
-
Outhaul: 1
-
Buntlines: 2 to 4
|
Running Rigging for a Studding sail
-
Halyard: 1
-
Sheet, Tack: each 1
-
some lashings
Studding sails were no longer used after 1850. Todays yards are wide enough, and the use of studding sails
was complicated.
|
Using these definitions, You can name all the lines for all sails easily,
even if You have no chance to go onboard a sailship ever (You are not living at the coast,
the ship is far way on the seas, or it is lost long ago).
All You need are the names and the number of the sails for the ship.
Small photos, which are available almost anywhere today,
are helpful to identify all details needed, up to counting the buntlines
of a sail.
Example: Three-Masted Barque "Sagres II"
2 square rigged masts (fore and main), with 5 yards each (lower, lower and upper topsail, topgallant, royal)
1 mizzen mast with spanker (lower and upper) and 1 gaff topsail
3 staysails between two masts
4 staysails on the bowsprit
This makes the following list of the Running Gear complete:
- Fore staysails:
|
Sail / Line
|
Halyard:
|
Sheet:
|
Downhaul:
|
|
Fore stay-sail:
|
Fore stay-halyard
1
|
Fore stay-sheet
2
|
Fore stay-downhaul
1
|
|
Inner jib:
|
Inner jib-halyard
1
|
Inner jib-sheet
2
|
Inner jib-downhaul
1
|
|
jib:
|
jib-halyard
1
|
jib-sheet
2
|
jib-downhaul
1
|
|
Outer jib:
|
Outer jib-halyard
1
|
Outer jib-sheet
2
|
Outer jib-downhaul
1
|
- Fore mast square sails:
|
Sail / Line
|
Halyard:
|
Sheet:
Tack:
|
Topping Lift:
|
Brace:
|
Clewline:
|
Buntline:
|
Bowline:
|
|
Fore Course:
|
(no halyard → rack)
|
Fore-sheet
Fore-tack
4
|
Fore-topping lift
2
|
Fore-brace
2
|
Fore-clewline
2
|
Fore-buntline
6
|
Fore-bowline
2
|
|
Fore-lower top-sail:
|
(no halyard → rack)
|
Fore-lower top-sheet
2
|
Fore-lower top-topping lift
2
|
Fore-lower top-brace
2
|
Fore-lower top-clewline
2
|
Fore-lower top-buntline
6
|
Fore-lower top-bowline
2
|
|
Fore-upper top-sail:
|
Fore-upper top-halyard
1
|
Fore-upper top-sheet
2
|
Fore-upper top-topping lift
2
|
Fore-upper top-brace
2
|
Fore-upper top-downhaul
(Fore-upper top-clewline)
2
|
Fore-upper top-buntline
2
|
Fore-upper top-bowline
2
|
|
Fore-topgallant-sail:
|
Fore-topgallant-halyard
1
|
Fore-topgallant-sheet
2
|
Fore-topgallant-topping lift
2
|
Fore-topgallant-brace
2
|
Fore-topgallant-clewline
2
|
Fore-topgallant-buntline
6
|
Fore-topgallant-bowline
2
|
|
Fore-royal-sail:
|
Fore-royal-halyard
1
|
Fore-royal-sheet
2
|
Fore-royal-topping lift
2
|
Fore-royal-brace
2
|
Fore-royal-clewline
2
|
Fore-royal-buntline
4
|
Fore-royal-bowline
|
- Staysails between Fore- and Mainmast
|
Sail / Line
|
Halyard:
|
Sheet:
|
Downhaul:
|
|
Mainstay-sail:
|
Mainstay-halyard
1
|
Mainstay-sheet
2
|
Mainstay-downhaul
1
|
|
Maintopstay-sail:
|
Maintopstay-halyard
1
|
Maintopstay-sheet
2
|
Maintopstay-downhaul
1
|
|
Maintopgallant stay-sail:
|
Maintopgallant stay-halyard
1
|
Maintopgallant stay-sheet
2
|
Maintopgallant stay-downhaul
1
|
- Main mast square sails:
|
Sail / Line
|
Halyard:
|
Sheet:
Tack:
|
Topping Lift:
|
Brace:
|
Clewline:
|
Buntline:
|
Bowline:
|
|
Mainsegel:
|
(no halyard → rack)
|
Main-sheet
Main-tack
4
|
Main-topping lift
2
|
Main-brace
2
|
Main-clewline
2
|
Main-buntline
6
|
Main-bowline
2
|
|
Main-lower top-sail:
|
(no halyard → rack)
|
Main-lower top-sheet
2
|
Main-lower top-topping lift
2
|
Main-lower top-brace
2
|
Main-lower top-clewline
2
|
Main-lower top-buntline
6
|
Main-lower top-bowline
2
|
|
Main-upper top-sail:
|
Main-upper top-halyard
1
|
Main-upper top-sheet
2
|
Main-upper top-topping lift
2
|
Main-upper top-brace
2
|
Main-upper top-downhaul
(Main-upper top-clewline)
2
|
Main-upper top-buntline
2
|
Main-upper top-bowline
2
|
|
Main-topgallant-sail:
|
Main-topgallant-halyard
1
|
Main-topgallant-sheet
2
|
Main-topgallant-topping lift
2
|
Main-topgallant-brace
2
|
Main-topgallant-clewline
2
|
Main-topgallant-buntline
6
|
Main-topgallant-bowline
2
|
|
Main-royal-sail:
|
Main-royal-halyard
1
|
Main-royal-sheet
2
|
Main-royal-topping lift
2
|
Main-royal-brace
2
|
Main-royal-clewline
2
|
Main-royal-buntline
4
|
Main-royal-bowline
|
- Staysails between Main- and Mizzenmast
|
Sail / Line
|
Halyard:
|
Sheet:
|
Downhaul:
|
|
Mizzen stay-sail:
|
Mizzen stay-halyard
1
|
Mizzen stay-sheet
2
|
Mizzen stay-downhaul
1
|
|
Mizzen topstay-sail:
|
Mizzen topstay-halyard
1
|
Mizzen topstay-sheet
2
|
Mizzen topstay-downhaul
1
|
|
Mizzen topgallant stay-sail:
|
Mizzen topgallant stay-halyard
1
|
Mizzen topgallant stay-sheet
2
|
Mizzen topgallant stay-downhaul
1
|
- Mizzen mast sails
|
Sail / Line
|
Outhaul:
|
Downhaul:
|
Sheet:
|
Inhaul:
|
Buntline:
|
Sheet:
|
|
Lower-Mizzen-sail (Spanker):
|
Lower-Mizzen-outhaul
1
|
Lower-Mizzen-downhaul
1
|
Lower-Mizzen-sheet
1
|
Lower-Mizzen-inhaul
1
|
Lower-Mizzen-buntline
1
|
Spanker sheet
2
|
|
Upper-Mizzen-sail:
|
Upper-Mizzen-outhaul
1
|
Upper-Mizzen-downhaul
1
|
Upper-Mizzen-sheet
1
|
Upper-Mizzen-inhaul
1
|
Upper-Mizzen-buntline
2
|
Gaff vang
2
|
|
Mizzen-gaff top-sail:
|
Mizzen-gaff top-peak halyard
1
|
Mizzen-gaff top-downhaul
1
|
Mizzen-gaff top-sheet
1
|
|
|
|
O.K. What is left now is the belayings on the pin rails and fiferails.
The Belayings
Even if You have some knowledge about it, it is still hard to identify lines coming down from the mast tops
to the pin rails; it could be a buntline, a clewline, a sheet or whatever - You cannot see it.
Even if You have a chance to be onboard, walk around and make your own observations ...
on the Sagres it looks like this (I made these pictures in 2005):
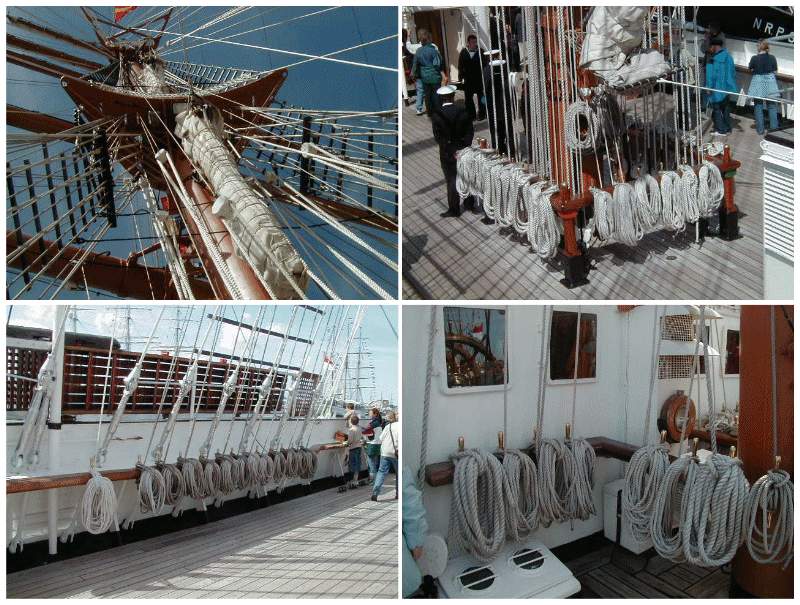
The only way here is to talk to the cadets and officers.
Only few of us ever served on a training sailship,
so You need their help.
In August 2005, I was in Bremerhaven, Germany, onboard the Sagres II, the Portuguese training ship
- the Gorch Fock had no Open Ship that day, pity ...
About an hour I looked at any detail of the ship and made some drawings and photos.
An officer noticed my interest and started grining ... so so, yet another modelmaker.
He invited me under deck to meet the cadets, and I could speak some English with them (my native language is German,
theirs is Portuguese).
They were very kind to answer all of my questions, and they made copies for me from their education books,
explaining every belaying pin - in Portuguese :) We translated them all into English, and back home
I translated it to German.
The Gorch Fock is a sister ship of the Sagres, all 4 barques of that class share the same rigging (well, almost),
and so You can reconstruct the other ships by visiting only one (with some small differences of course)
A proof for this way of reconstruction is the manual of the USCG Eagle, showing the same belaying pins.
There are some patterns and conventions for belayings - BUT: there are no fixed rules, the rigging is adapted and changed over time.
What the plans say is valid for a short period of time only, just long enough for a cadet class to be memorized for manoevres,
but almost certainly altered with the next re-rigging over the winter period when the ship is layed up.
Even most cadets have no clue that these things change.
- There are no decorative lines without function.
- Pinrails
- Belayings: the order from-bottom-to-top
is tranlated to from-mast-center-to-aft
- All Belayings, with only few exceptions, are symmetric on port and starboard sides.
- Fiferails (around the mast)
- Belayings: the order from-bottom-to-top
is tranlated to from-admidships-to-outside.
- The sided of the fiferails normally are for the sheets and clewlines, and the aft part of the fiferail
is reserved for the staysail halyards or downhauls
- Belayings are short of pins, there is not much space on the ship.
So You may find some pins belayed doubled. A good example are the buntlines of the lower sails
(up to three for each side), because they are moved only together in the same directions.
On the other hand, cables of opposite functions, like sheets and clewlines, cannot share the same pin.
On the Sagres, they use neighbored pins for them.
-
Following an old tradition, the halyard of the fore topsail (today the upper topsail)
has its triple block tackle on port side. The next upper halyard then is on startbord,
the next again on port an so on, keeping this kind of alternation, in order to equalize the
strain forces over both rails.
So it is:
- Fore upper halyard on port
- Fore topgallant halyard on starboard
- Fore royal halyard on port
With six yards on the mast, this alternation is still used, thus the royal halyard then on starboard.
The alternation is also valid between the masts:
- Main upper halyard on starboard
- Main topgallant halyard on port
- Main royal halyard on starboard
When the ship has more than two masts with square rigging, the next topsail halyard
is on port again and so forth ...
- There are no universal rules for all ships through all times.
After all, every ship has its own conventions, even if many belaying arrangements are similar.
Braces on winches do not have belaying pins, like on the Kruzenshtern.
Some belaying are altered under special situations; a storm weather sail
has more buntlines and a reef tackle, which You do not see on a fine weather sail.
The GIFs of the belayings are big (130 kB),
if You want to read the names of the lines, click on the thumbs,
and there You are. Have fun !
And here are they: the belaying pin plans of the sister ships "Sagres II", the USCG "Eagle" and the "Gorch Fock II":
Belayings on Sagres II
in Portuguese (after original plans)
|
Belayings on USCG Eagle
in English (according to the manual)
|
Belayings on Gorch Fock II
in German (after original plans)
|
Belayings on Mircea
... in the making ...
|
These plans of the Gorch Fock class may look the same, but they are not identical, so You should not take one pins
from Sagres II and look for it on the Eagle plan. The belayings are different! If You want to translate the names
correctly, You may use my little
Maritime Dictionary that
I made for this page; it contains 1000 terms in 10 languages.
As You may have noticed, English is not my native language; I am German and live in Sweden.
So if You feel that some error should be corrected, please drop me a line! Thank You!
|